
You'll need this:
-
One of these Pointerpro plans:
 Professional Enterprise ReportR DistributR
Are you wondering how to get started with building your assessments with personalized feedback? Try our onboarding cookbook: a tool that provides you with a personalized cookbook of all the information and Pointerpro features to build what you need. Start the assessment
- Use Contact Lists
- Set up email invitation
- Use variables to track respondents
- Add a reminder
- View email status
1. Use Contact Lists
Email invitations are sent to Contact Lists. Rather than entering recipient email addresses individually, you can upload your contacts to a Contact List and select that list when creating an invitation.
Using Contact Lists makes it easy to send personalized invitations to multiple respondents at once and schedule reminders for the same group of recipients.
Before creating your email invitation, make sure your Contact List contains all of the recipients you want to invite.
When you save an email invitation, Pointerpro uses the Contact List as it exists in that moment.
Any changes made to the Contact List afterward are not reflected in the existing invitation.
Contacts added after the invitation is created will not receive the invitation or scheduled reminders.
Contacts removed after the invitation is created will still receive the invitation and any scheduled reminders.
If you need to invite contacts that were added later, create a new email invitation using a Contact List that contains those new contacts.
2. Set up email invitation
2.2 Build the Email
2.3 Write the email
2.4 Save your email
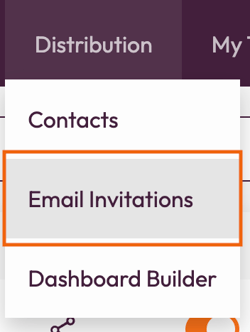
To create your invite, navigate to Distribution and select Email Invitations in the drop-down menu.
2.1 Create a new invite
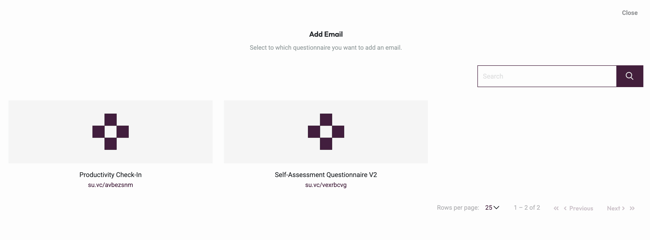
Click Create Email, selec the questionnaire you want to send, and then click Add Email

2.2 Build the Email
To build your message, you need to add all the information required.
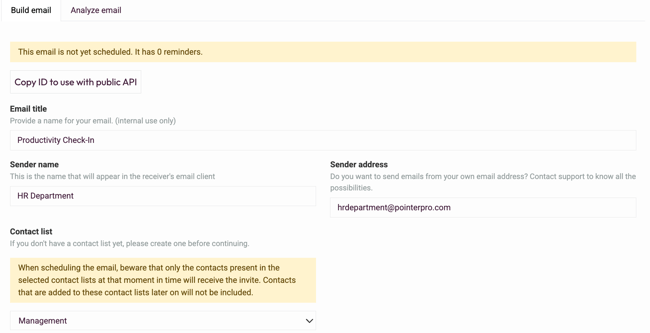
- Title: An internal name for your email template. Choose a descriptive title if you plan to create multiple templates.
- Sender name: The name recipients will see as the sender.
- Sender address: The reply-to email address recipients can contact.
- Contact list - Select one or more Contact Lists to receive the invitation.
If you'd like to send emails from your own domain instead of Pointerpro's defauly sneding domain (info@su.vc), you'll need to configure a custom sender domain (white label).
Follow our white label setup guide for step-by-step instructions. If you need any assistance during the setup, please contact support@pointerpro.com for more information.
2.3 Write the email
The next step is to add the email content:
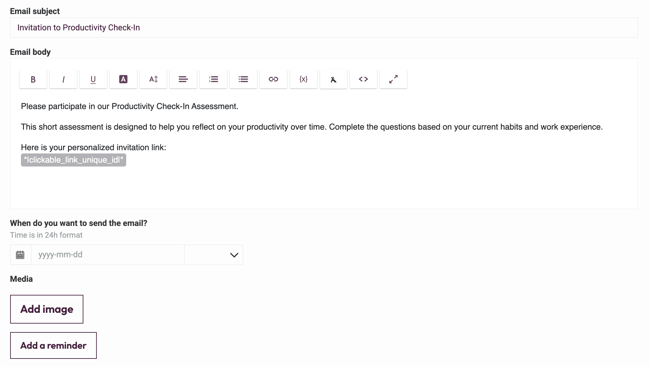
- Subject: The subject line recipients will see.
- Body: Write your message, format the content, and add variables to personalize the invitation.
- Schedule: Choose when the invitation should be sent.
- Add image: Optionally upload an image or logo to include in the email.
Make sure your email contains a questionnaire link so recipients can access the assessment!
2.4 Save your email
When you're finished:
- Click Save as Draft to save the invitation without sending it.
- Click Schedule to schedule or send the invitation.

Use Preview to verify that your formatting, images, and survey links appear correctly before sending.
3. Personalize email with variables
Invite variables allow you to personalize email invitations and uniquely identify responsents.
For example:
Hi *|contact_first_name|*,
You can also use questionnaire link variables to generate a unique assessment link for each recipient.
Why use a quesionnaire link with a Unique ID?
Without a questionnaire link that includes the UID:
- Responses cannot be assoiated with Contacts
- Reminder emails cannot determine who still needs to respond.
- Save & Continue will not work.
- Contact information will not appear in Results.
If you're using a custom (white label) domain, use the questionnaire link that includes both your white label domain and the UID parameter.
Add variables
To insert a variable:
- Place your cursor where you'd like the variable to appear
- Click Insert Variable
- Sleect the variable from the list
You can use variables anywhere in the email body.

Create a clickable survey link
You can add a questionnaire link in two ways:
Insert a clickable link variable
Open the Variables menu, select Questionnaire Links, and choose one of the available options:
- Clickable link
- Clickable link with Unique ID
The link is inserted directly into the email body and is ready for recipients to click.
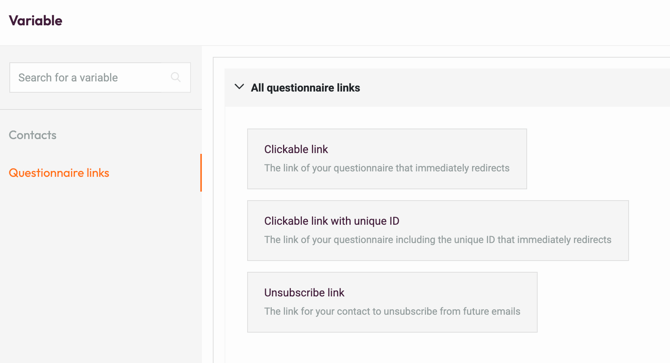
Use the Clickable link with unique ID when you need to identify respondents, track their progress, send reminders, or display their Contact information in Results.
Hyperlink custom text
- Type the text you want recipients to click, such as "Here".
- Highlight the text.
- Click Insert Link
- Insert the questionnaire link into the URL field.
- Save the link
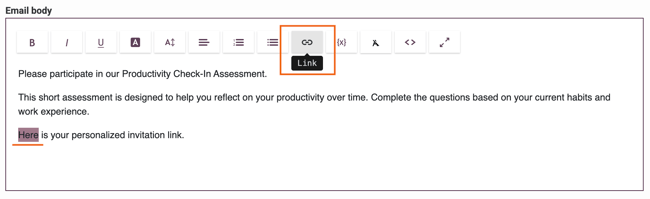
The displayed text becomes the clickable hyperlink.
To comply with GDPR regulations, include an Unsubscribe variable in your email inviation.
Recipients who unsubscribe will be marked accordingly in the Contact List.
4. Schedule reminders
You can schedule reminder emails when creating your invitation, so you don't have to manually follow up with respondents later.
To add a reminder:
- Scroll to the bottom of the email invitation
- Click Add Reminder
- Configure the reminder email, just as you did for the original invitation.
- Choose the condition that determines when the reminder should be sent.
- Save your changes.
You can add multiple reminders if needed.
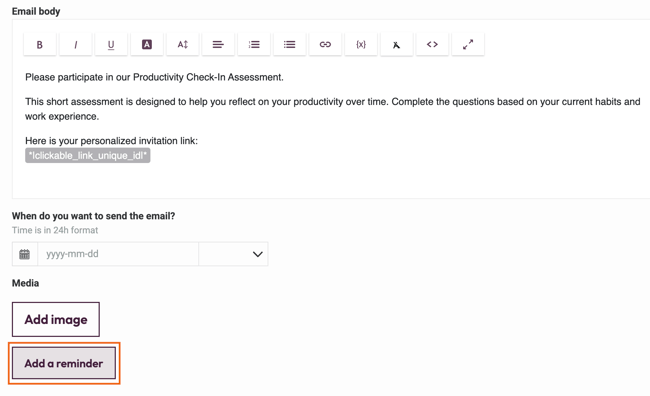
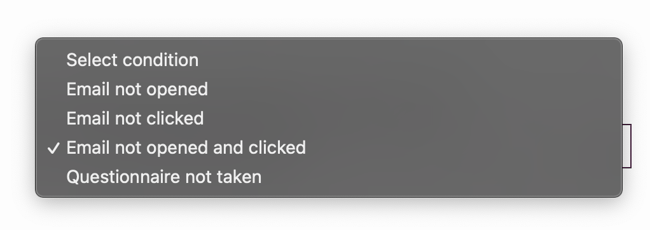
To send email reminder only to respondents who haven't completed the questionnaire, your invitation must use a Questionnaire Link with Unique ID. This allows Pointerpro to track each respondent's progress
After sendint your invitation, you can monitor its delivery and engagement.
Open your Email Invitation and select the Analyze email tab.
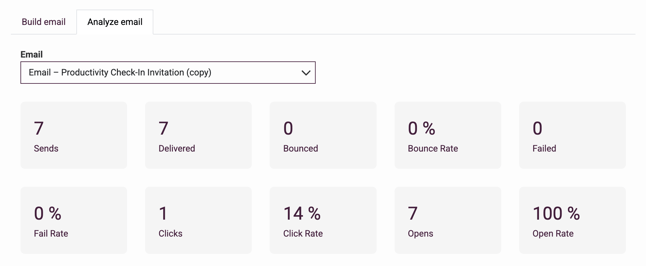
From here you can view:
- Delivery status
- Opens
- Clicks
- Recipient activity
Use the dropdown menu to select the invitation you'd like to analyze.
Once an invitation has been sent, it cannot be recalled.
Removing a contact from a Contact List after the invitation has been sent does not precent that contact from receiving the email.
What's next?
- Email templates feature allows you to send emails to your respondents based on their selected answers or a quiz/survey score. This is a great way to keep your respondents engaged! Email templates are so useful because each email can be customized according to each respondent's answers or score using editor variables.
- PDF Scheduler: The reports sent out by the scheduler are aggregate reports with all data totaled, as opposed to personalized reports with just one set of information. You can use PDF scheduler if you want to send a PDF report to specified contacts on a regular basis, send team members a weekly report, etc.
- Email notifications: When you want to receive a notification every time the survey was completed, you can turn on Email notifications. Enter your email address and the email addresses of colleagues who need to receive the emails as well.